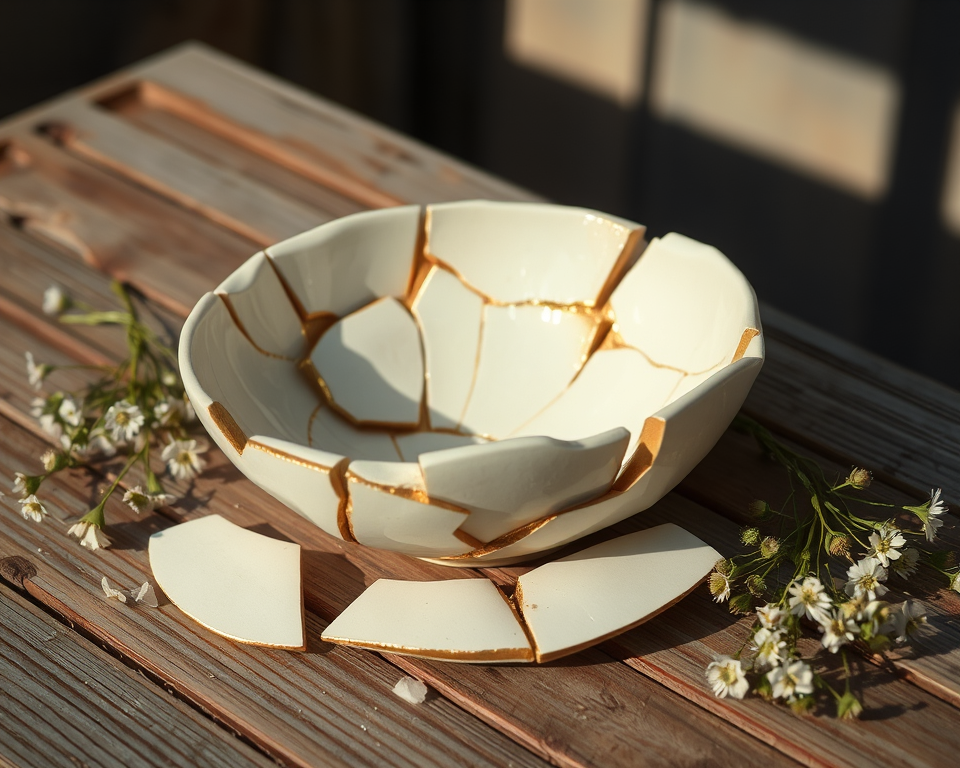
Have you ever faced the tragic moment when your favorite pottery piece shatters into countless pieces? Trust me, it’s heartbreak central. But here’s the silver lining: or in our case, the gold lining! With the age-old art of kintsugi, not only can you repair your beloved pieces, but you can also transform them into a unique work of art, celebrating the beauty of those imperfections instead of hiding them. It’s like giving your pottery a second chance, and, oh boy, does it look stunning!
You’ll enjoy learning about the incredible techniques and materials involved in this process, and I’m here to walk you through every step, so you can have your pottery looking as good as new—or even better! Let’s dive into this creative adventure!
Table of Contents
- 1 Key Takeaways
- 2 Techniques and Steps for Kintsugi Repair
- 3 Required Materials for Kintsugi
- 4 Step-by-Step Guide to Repairing Pottery with Gold
- 5 Troubleshooting Common Issues in Kintsugi
- 6 Enhancing Your Kintsugi Techniques
- 7 Safety Considerations in Pottery Repair
- 8 Frequently Asked Questions
- 8.1 What is the ideal adhesive for Kintsugi repairs?
- 8.2 Can I use other materials instead of gold for Kintsugi?
- 8.3 How can I prepare my pottery before applying Kintsugi techniques?
- 8.4 What safety precautions should I take when repairing pottery?
- 8.5 What common mistakes should I avoid during the Kintsugi process?
- 8.6 How long does the Kintsugi repair process take?
- 8.7 Is Kintsugi suitable for functional pottery?
- 8.8 How can I prevent future breakage in my Kintsugi pottery?
- 8.9 Can Kintsugi be applied to all types of pottery?
Key Takeaways
- Kintsugi is an ancient Japanese technique that uses lacquer mixed with gold powder to repair cracked pottery, celebrating its history and imperfections.
- Essential supplies include epoxy resin, gold powder, and safety gear to ensure a safe and effective repair process.
- Preparation and workspace organization greatly enhance your kintsugi experience and outcomes.
- Personalized artistic touches make your repaired pieces uniquely yours, adding sentimental value.
- Safety is paramount when working with adhesives and powders, so invest in protective gear to craft confidently.
Techniques and Steps for Kintsugi Repair
So, what’s kintsugi all about? At its core, this Japanese art form revolves around the idea of embracing flaws and imperfections. For me, it’s about telling a story through each repaired piece, making it even more special than it was before. We’re not just slapping on some duct tape; we’re infusing artistry into restoration.
To kick things off, you’ll primarily be using epoxy resin mixed with gold powder. This blend becomes the magic adhesive that not only binds the pieces together but adds that golden shimmer. And let’s be real, who doesn’t love a bit of sparkle in their life?
Preparing Your Workspace
Before we jump into the nitty-gritty, let’s talk about setting the stage. Having a clean, organized workspace is essential to keep everything safe and smooth. Here’s how I set up my kintsugi space:
- Clear off any clutter: A clean surface is non-negotiable. Make sure you’ve got enough room to spread out.
- Gather your supplies: Here’s what you’ll need:
| Material | Purpose | Approx. Price |
|---|---|---|
| Epoxy resin | Main adhesive | $15-25 |
| Gold powder | For that stunning finish | $10-30 |
| Safety gloves | Protects hands from adhesives | $5-10 |
| Dust mask | Prevents inhalation of materials | $5 |
| Mixing tools | For blending glue and gold powder | $5 |
- Safety first: Always wear gloves and a mask when working with any adhesive or powder. It’s better to be safe than sorry!
Even a simple setup can elevate your game. Plus, feeling organized really gets those creative juices flowing!
Required Materials for Kintsugi
Time to dig into what specific materials you’ll be needing for your project! I like to ensure I have everything upfront to avoid those pesky mid-repair trips to the store. It’s like preparing for battle!
1. Epoxy Resin: This is your primary adhesive. Brands like Gorilla 2-Part Epoxy ($20) are fantastic for pottery repairs since they dry clear and create a rock-solid bond.
2. Gold Powder: The shimmer is a must! I love using Mica Mineral Powder ($10), which gives a rich and vibrant gold finish. Just be mindful of how much you mix in; you want to get that perfect shade!
3. Mixing Tools: I tend to grab some small, disposable plastic cups and stir sticks. They are usually around $5 for a pack of 20, and they make mixing everything so much easier.
4. Acetone: This magical liquid is great for cleaning up any spills. You want everything to look pristine once you’re done!
By having these materials ready, you’ll embark on your kintsugi journey without hitches.
Step-by-Step Guide to Repairing Pottery with Gold
You’re probably itching to get started, so let’s jump right into the step-by-step process! It’s incredibly satisfying to see your pottery piece resurrected in such an artistic manner, and I can’t wait for you to experience it.
Step 1: Clean Your Pieces
Before anything, make sure your pottery pieces are free from dust and oils. A quick wipe-down with a cloth and acetone will do the trick.
Step 2: Prepare Your Epoxy
Follow the instructions on your epoxy canister for mixing. Typically, it involves combining equal parts of resin and hardener. This step is crucial—get it right, and you’ll find success in your kintsugi journey!
Step 3: Assemble the Pieces
Now, carefully align the broken pieces, ensuring they fit snugly together. Think of this moment as piecing together a puzzle—just a much more glittery one!
Step 4: Apply the Epoxy
Using your mixing tools, apply the epoxy to the edges where the pieces meet. Lay it on thick enough to fill in any gaps but keep it neat. Here’s where the artistry begins to shine.
Step 5: Add the Gold Powder
Before the epoxy sets, sprinkle the gold powder over the adhesive. This step is where it gets really fun! You can apply it however you like, creating intricate designs or just a simple dusting.
Step 6: Let It Cure
Patience, my friend! Allow the epoxy to cure according to the product’s instructions. This might take anywhere from 24 to 48 hours.
Step 7: Finishing Touches
Once cured, you’ll want to sand any rough edges to give it that polished look. I often finish off the project with a coat of clear sealant to protect the gold and keep the beauty intact.
“Kintsugi is not just about mending broken pieces; it’s about telling a story and finding beauty in each imperfection.”
Troubleshooting Common Issues in Kintsugi
Along the way, you might encounter a few hiccups—fear not! It’s all part of the learning experience, and I’ve got your back.
Dealing with Adhesive Problems
If you find that pieces aren’t bonding as expected, it’s often a matter of either insufficient epoxy application or not cleaning the edges properly initially. If you notice gaps, revisit the adhesive stage, and don’t hesitate to apply more!
Managing Aesthetic Expectations
Sometimes, what we envision might not match the final output. Remember, kintsugi celebrates imperfections. So, if you see some uneven patches, embrace them! They’re what make your pottery uniquely yours. Beauty is in the eye of the beholder, right?
“Every glitch in the repair adds to the character and story of the piece. Celebrate the flaws!”
Enhancing Your Kintsugi Techniques
Once you’ve mastered the basics, it’s time to explore and expand your skills. The world of kintsugi is rich with opportunities for creativity and personalization.
Exploring Alternative Kintsugi Materials
If you’re feeling adventurous, why not try using different powders or adhesives? While classic gold is stunning, you could explore:
- Silver Powder for a cooler look
- Copper Powder for a rustic charm
- Even experiment with colorful pigments to create a vibrant artwork piece!
By broadening your material horizons, the possibilities for your pottery restoration are endless.
Personalizing Your Kintsugi Projects
Inject your personality into your repaired creations! This could be as simple as choosing specific colors or patterns with your gold powder. You could also add elements like:
- Handwritten notes on the back of the piece
- Incorporating twine or natural fibers for texture
- Including small beads or other decorative materials
Personalizing your pieces makes the emotional connection even stronger, telling your unique story through every crack and joint.
Safety Considerations in Pottery Repair
As with any fantastic crafting adventure, safety is paramount. Working with adhesives and powders can present some risks, so let’s make sure you’re protected.
Handling Gold and Adhesives
When using chemical adhesives or powders, always wear gloves and a dust mask. It’s easy to get caught up in the excitement, but protecting your respiratory health is essential.
Always work in a well-ventilated space! Open windows or use a fan if you can. Fresh air is your friend here.
Creating a Safe Workspace
Keep your workspace organized and free of hazards. If I have any spills, I clean them promptly, avoiding any accidents. Trust me, a cluttered workspace leads to bad decisions—so keep that area neat.
Keep protective gear close, and make an effort to practice safe crafting habits throughout your project.
With these techniques, materials, and safety tips, you’re ready to embark on your kintsugi journey. Enjoy picking up your broken pieces and creating stunning art that radiates your story!
Frequently Asked Questions
What is the ideal adhesive for Kintsugi repairs?
For Kintsugi, a strong, versatile adhesive like epoxy resin or cyanoacrylate (super glue) is recommended. These adhesives ensure a secure bond for pottery pieces, enabling them to hold together effectively during the repair process while allowing for the application of gold or other decorative elements.
Can I use other materials instead of gold for Kintsugi?
Yes, many artisans experiment with non-traditional materials such as silver, copper, or even colored epoxy. These alternatives can produce unique visual effects and are often chosen to match the aesthetic preferences of the repairer, maintaining the spirit of Kintsugi by embracing creativity and personalization.
How can I prepare my pottery before applying Kintsugi techniques?
Preparation involves cleaning the broken edges of the pottery to remove dirt, dust, or glaze remnants that could interfere with the adhesive bond. Smooth any jagged edges carefully if needed, and set up a clean and organized workspace to facilitate the repair process and achieve the best results.
What safety precautions should I take when repairing pottery?
When engaging in Kintsugi, it’s essential to wear protective gloves to prevent skin contact with adhesives and gold powder. Additionally, ensure adequate ventilation when working with materials to avoid inhaling harmful particles, especially those from adhesives or powders.
What common mistakes should I avoid during the Kintsugi process?
Common mistakes include applying too much adhesive, which can create unsightly excess around the joints, and rushing the drying process. It’s also vital not to use incompatible materials, as some adhesives may not bond well with certain pottery types or finishes.
How long does the Kintsugi repair process take?
The Kintsugi process duration varies depending on the size and complexity of the repair. Generally, it can take a few hours to complete the initial adhesive work, plus additional drying time—often up to 24 hours—before applying gold or finishing touches for optimal results.
Is Kintsugi suitable for functional pottery?
Kintsugi can be used for functional pottery, but it’s important to note that the repaired areas may not withstand the same level of stress as before. If you choose to use repaired items for food or beverages, ensure that the materials used are food-safe and consider keeping repaired pieces primarily for decorative purposes.
How can I prevent future breakage in my Kintsugi pottery?
To minimize the risk of future breakage, handle your Kintsugi pottery carefully and store it in padded or cushioned areas. Avoid exposing repaired items to extreme temperatures or placing them in precarious locations where they could easily fall or be knocked over.
Can Kintsugi be applied to all types of pottery?
While Kintsugi can be applied to many types of pottery, it is most effective on pieces with clear break lines. Porous or extremely brittle ceramics may not hold together well and could make the repair more challenging. Selecting appropriate pieces for Kintsugi can ensure a successful restoration.